Sections covered in this guide
- Setting up your webcam
- Setting up your Laptop for audio playback
- Joining the zoom room on your laptop
- configuring audio and video settings inside zoom
- Renaming your device in zoom
REQUIRED TIME FOR SETUP: approximately 15 minutes
minimum Equipment required
- 1 1080p webcam (must be external, cannot be built in)
- 1 laptop with headphone output (so you can run your audio playback to your gym's speakers) and an ethernet port (or ethernet adapter)
- 1 ethernet cord long enough to reach from your internet router to your setup location (more on that later)
- 1 additional device to watch the show and cue your team
IMPORTANT:
EVERY TEAM
MUST BE ON-STREAM 20 MINUTES BEFORE
THEIR TIME
EVERY TEAM
MUST BE ON-STREAM 20 MINUTES BEFORE
THEIR TIME
Section 1: setting up your laptop
In this section we will talk about the basis of our entire setup for this guide, the LAPTOP. This includes placement of the laptop, downloading the necessary programs, and plugging in the necessary cables.
YOUR MUSIC THAT IS GOING TO BE PLAYED DURING THE COMPETION MUST BE ON AND PLAYED FROM THIS LAPTOP.
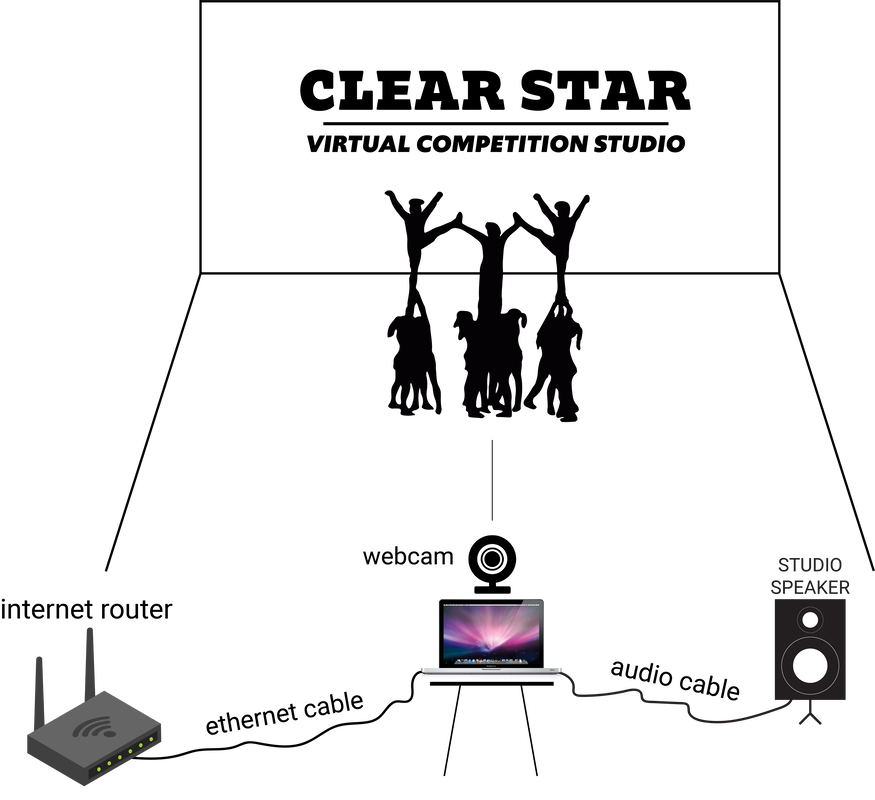
The setup will consist of
BEFORE YOU SET UP ANYTHING, make sure that you have restarted your laptop and have closed any other open apps on the device. This will ensure that none of your computers resources are being taken by other apps.
DOWNLOADING ZOOM:
the only applications you will need for the show are ZOOM (which can be downloaded here) and your music player application of choice (ie. windows media player, vlc, quicktime, etc)
YOUR MUSIC THAT IS GOING TO BE PLAYED DURING THE COMPETION MUST BE ON AND PLAYED FROM THIS LAPTOP.
The setup will consist of
- laptop placement
- webcam placement
- hooking up your audio and ethernet cables
- downloading Zoom
BEFORE YOU SET UP ANYTHING, make sure that you have restarted your laptop and have closed any other open apps on the device. This will ensure that none of your computers resources are being taken by other apps.
DOWNLOADING ZOOM:
the only applications you will need for the show are ZOOM (which can be downloaded here) and your music player application of choice (ie. windows media player, vlc, quicktime, etc)
|
LAPTOP PLACEMENT:
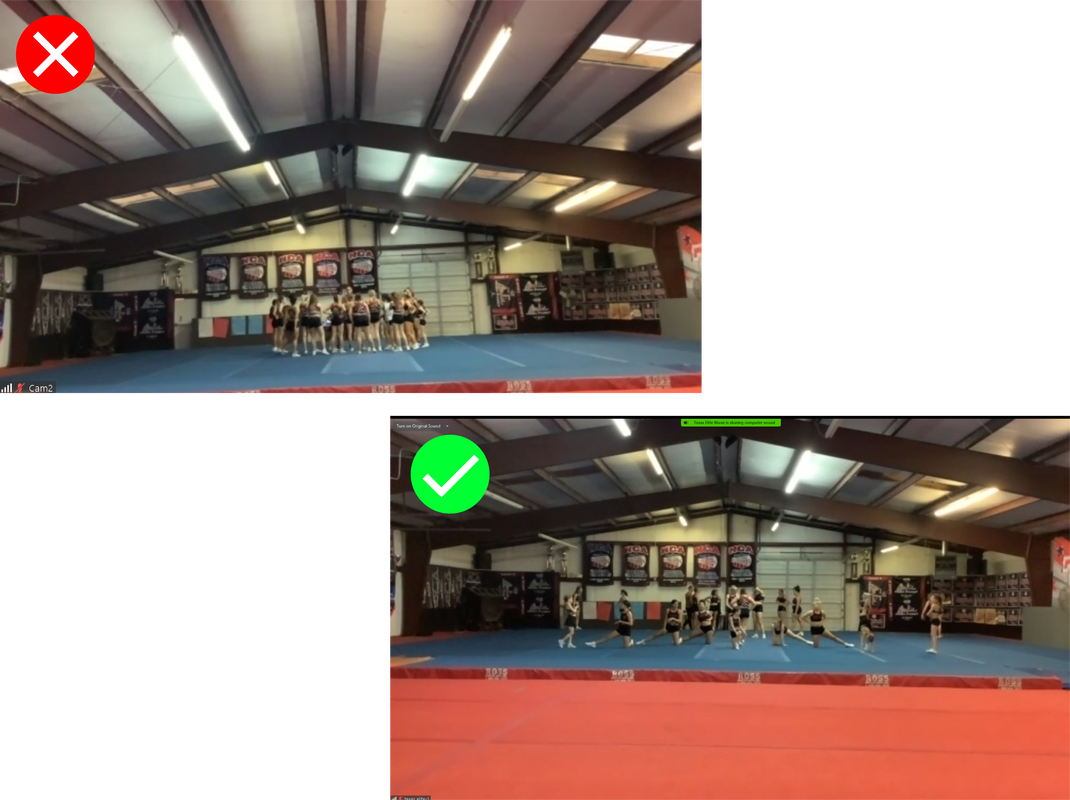
Your laptop should be in front of and centered on your gym mat, on an elevated location like a table or stand. The laptop should be far enough back to not interfere with your contestants. WEBCAM PLACEMENT: Your webcam should at least 5 feet off of the ground and be far back enough so that you can see the floor beneath all of the contestants at their furthest point forward. It also shouldn't cut off their hands or heads at their highest point (see examples below). Some additional notes:
|
Note on lighting: please make sure that all of your overhead gym lighting is on and, when possible, all door or windows are either closed or behind the camera (If you have an open window or door in front of the camera, the light coming in will backlight your contestants)
|
PLUGGING IN YOUR CORDS
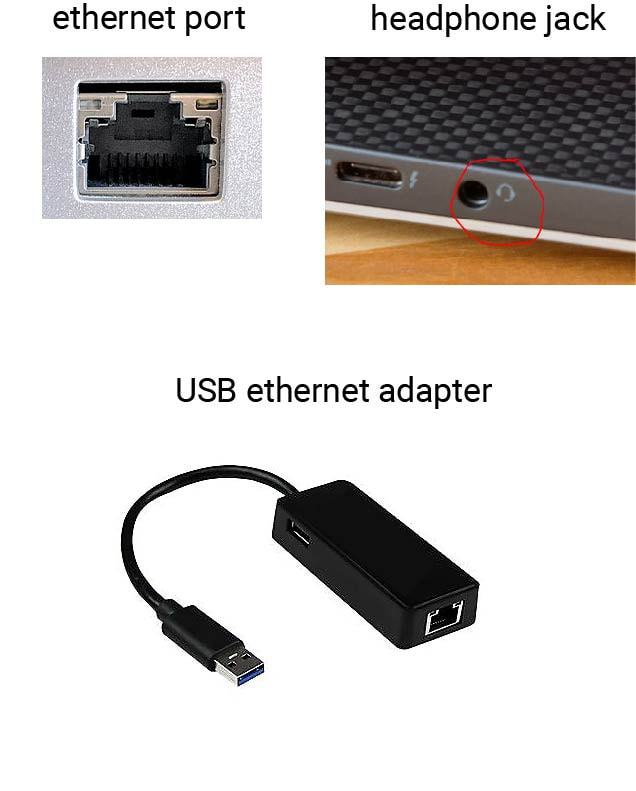
For this setup, you are going to need to plug into 2 cords: an ethernet cable and an audio cable. Ethernet Cable: The ethernet cable is what is going to supply your laptop with internet. While almost all modern laptops have wifi, a direct line to your gym's router is going to provide a much more stable connection then Wi-Fi. While an ethernet cable is recommended, you can use Wi-Fi AT YOUR OWN RISK. To test your laptops internet speed, you can use the web site SpeedTest.net . For a stable connection, it is recommended to have at least 40 mbps download and 7 mbps upload. NOTE: if your laptop doesn't have an ethernet port built in, you can buy a usb ethernet adapter (see picture) Audio Cable: This is what is going to supply the audio playback to your gym's sound system. You will plug one end into your computer (like a pair of headphones) and the other end into your gym's sound system (or speaker). NOTE: If your gym usually connects to it's speaker system via bluetooth, please follow the steps for bluetooth below. |
CONNECTING your laptop to bluetooth: pc
Step 1: go to the bluetooth settings of your PC. Quickest way to get to your bluetooth settings on your PC is to hit the windows button in the bottom left corner of the screen and type "bluetooth." The bluetooth and other devices button should appear. Select that to be taken to the bluetooth settings.
Step 2: Click the "Add Bluetooth or other device" button at the top of the menu. It's the menu item with the "+" sign next to it.
Step 3: On the menu that has opened, select the top menu item that says "Bluetooth".
Step 4: On your Bluetooth device (your gym's speaker, sound system, etc.), put the device in pairing mode (the activation of this mode is different on all devices).
Step 5: On your PC, your Bluetooth device should appear in the menu you have navigated to. Select your device from the menu to pair your device with your PC.
CONNECTING YOUR LAPTOP TO BLUETOOTH: MAC
STEP 1: Navigate to your System Preferences on your mac computer and open it. The System Preferences icon is a gray box with a gear inside of it.
STEP 2: Find the search bar in the top right of the System Preferences window and type in the word "bluetooth". this should highlight the bluetooth option in the system preferences.
STEP 3: Select the Bluetooth icon that has been highlighted to open the Bluetooth settings.
Step 4: On your Bluetooth device (your gym's speaker, sound system, etc.), put the device in pairing mode (the activation of this mode is different on all devices).
Step 5: On your Mac, your Bluetooth device should appear in the menu you have navigated to. Select your device from the menu to pair your device with your Mac.
SECTION 2: Configuring audio & video in zoom
This section will cover how to configure your audio and video output inside the ZOOM application.
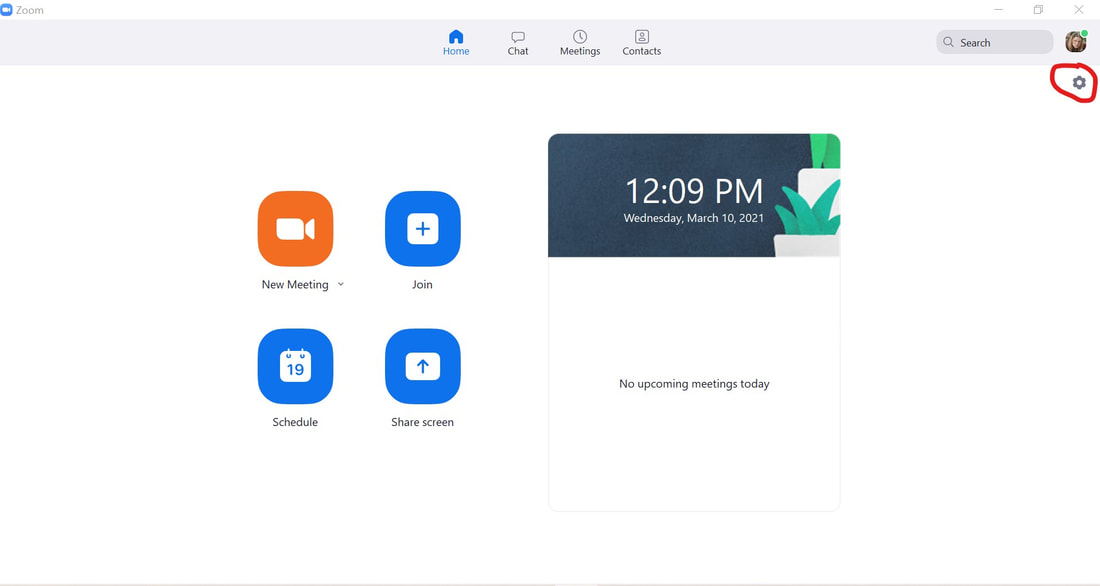
Step 1: Open the Zoom application and click the settings gear in the top right of the screen.
Step 1: Open the Zoom application and click the settings gear in the top right of the screen.
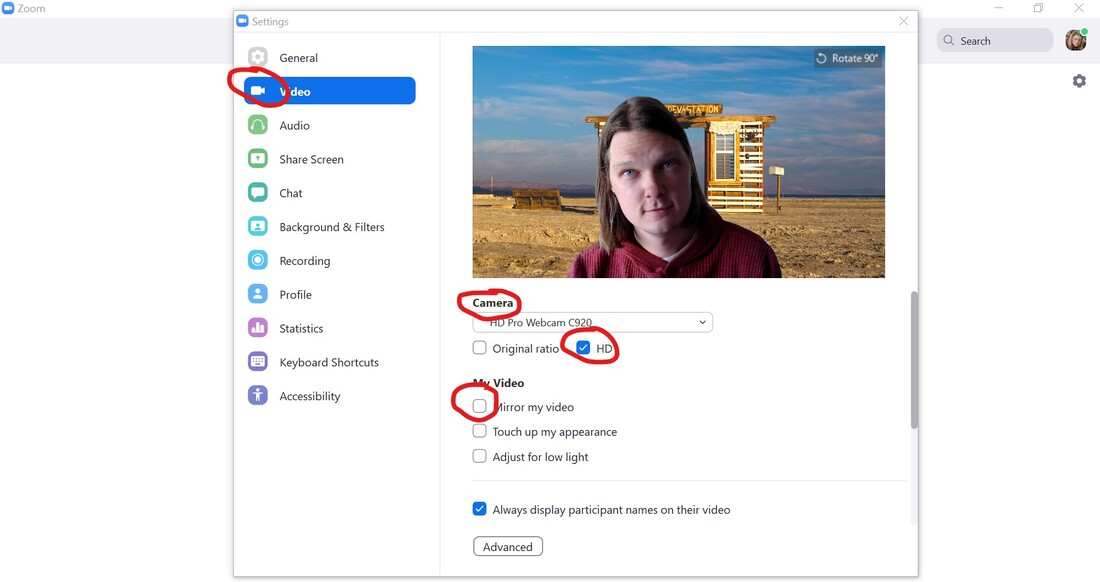
Step 2: click the video section on the left side of the settings window that opened. In this section you need to configure a few things:
- make sure that camera that is being used is the external webcam and not the built-in webcam. The active camera will appear in the preview window.
- make sure that HD is enabled.
- make sure that MIRROR MY VIDEO is disabled.
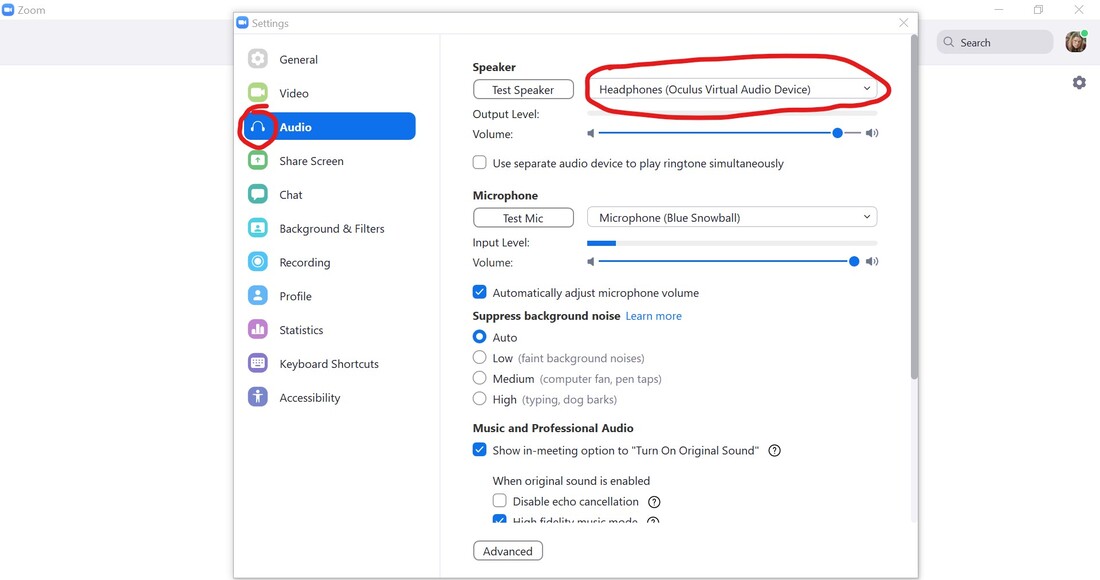
Step 3: click the audio section on the left side of the settings window. In this section you need to configure the speaker section. Select the headphone output on your laptop. To make sure that you are using the correct audio output, use the test speaker button to see if it's coming out of your gym's speakers.
Section 3: setting up audio playback
This section will cover the setup of audio playback on your laptop.
To get your device ready for playback you will need to take these prerequisite steps:
Once the competition begins, someone from our team will make your playback computer a co-host. This will allow you to share your screen / audio.
To allow audio playback of your computer through zoom, please follow the tutorial below:
To get your device ready for playback you will need to take these prerequisite steps:
- Set the audio level to 85% via the volume buttons on the laptop.
- Set the audio level of your music player application on your computer to 85 (or near max).
- Join Zoom room via the link sent to you by your event coordinator in your welcome package. This link is the only zoom room you are going to need for the entire event.
Once the competition begins, someone from our team will make your playback computer a co-host. This will allow you to share your screen / audio.
To allow audio playback of your computer through zoom, please follow the tutorial below:
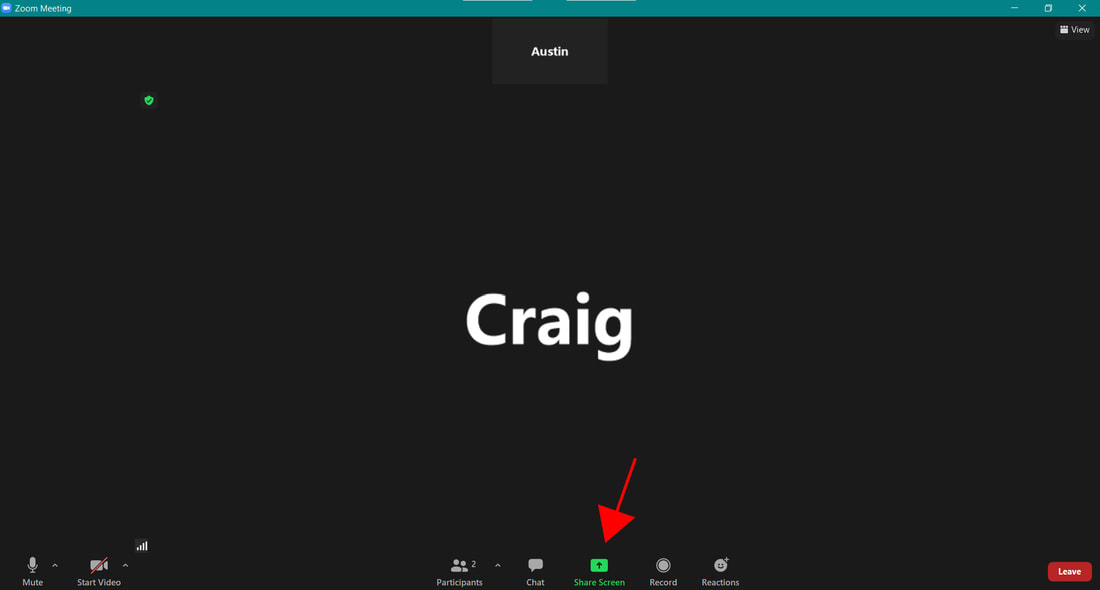
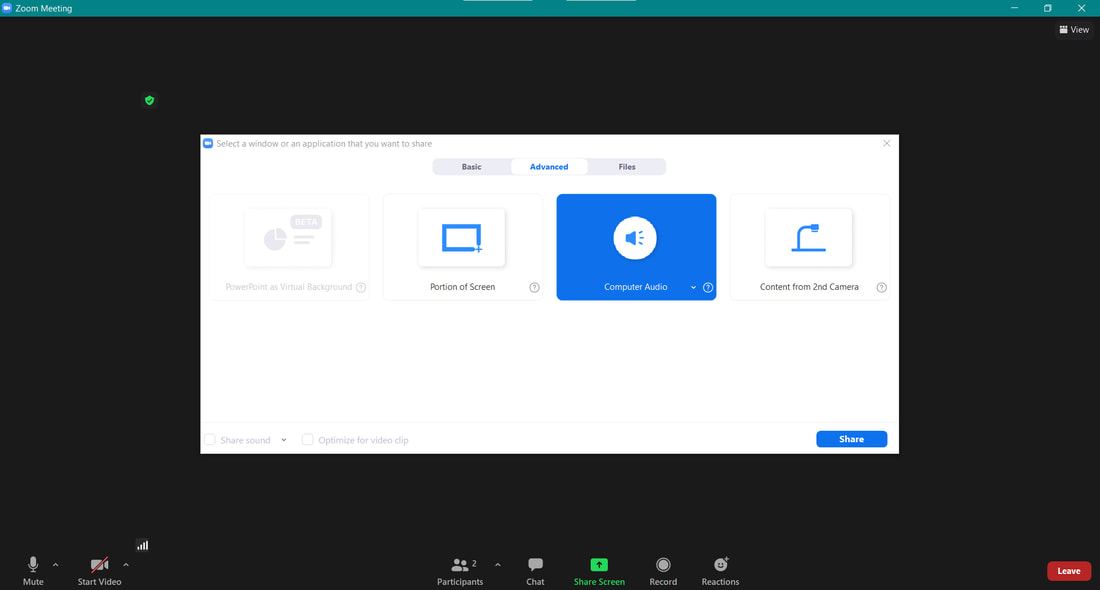
STEP 1: Make sure your mic is muted by checking the bottom left of the tool bar in the Zoom application.
STEP 2: Click the Share screen button in the center of the bottom tool bar of the Zoom application
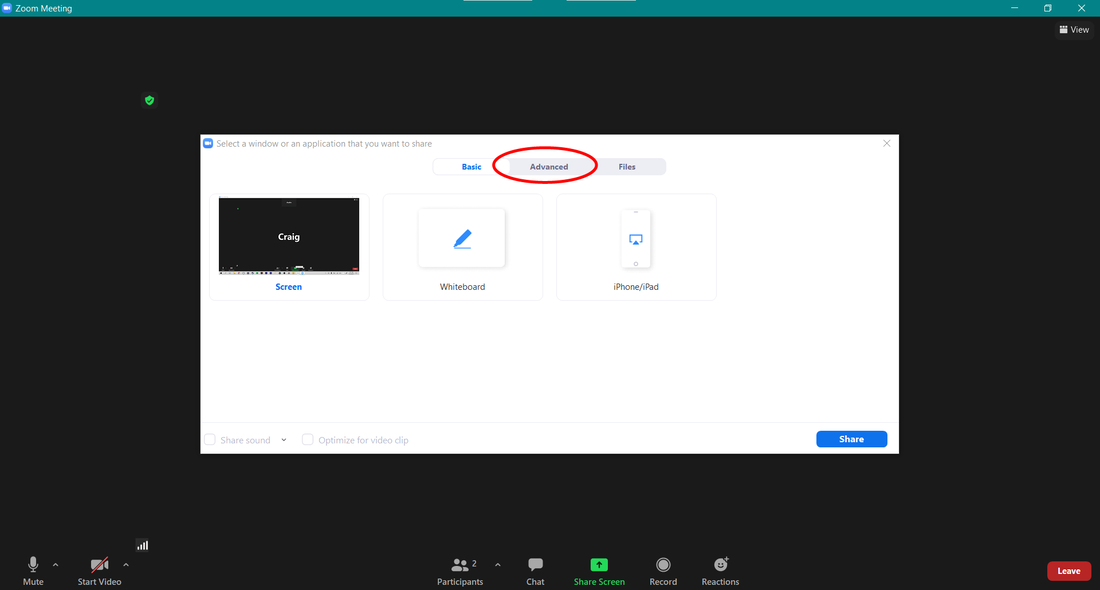
STEP 3: At the top of the window that opens, click the button that says "ADVANCED"
STEP 4: Click music or computer sound only in the the "ADVANCED" options section
STEP 5: In the lower right hand corner, click the SHARE button.
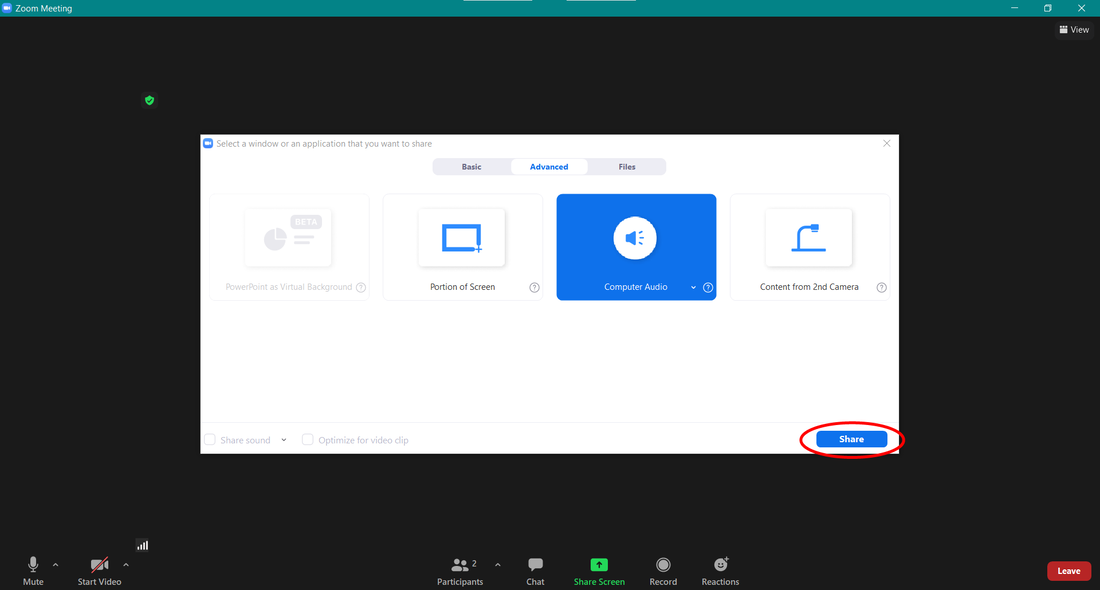
Note: Make sure that the audio playback isn't playing when you initially share your audio. Only start playback when cued to start. You are welcome to test these setting in your own personal zoom before joining the show zoom.
Section 4: Renaming yourself in zoom
This section will cover how to rename each of your inputs once your in the Zoom room, as well as what to rename yourself to.
It is CRUCIAL that you follow correct naming conventions during the event, as it is the only way our team knows who you are and what input each device is.
The naming conventions are as follows:
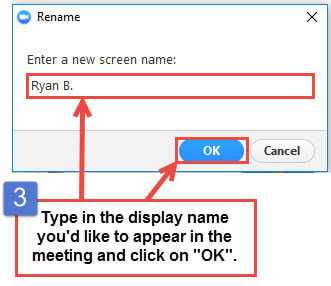
[STUDIO NAME] - [TEAM NAME]
An example for would be something like this: Clear Star Media - The Star Boys
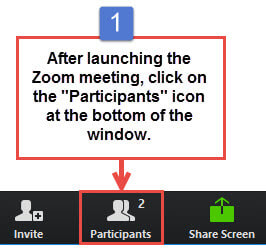
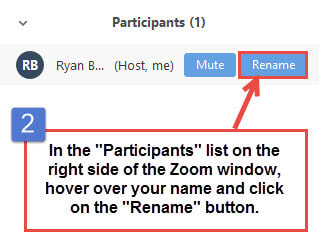
To properly rename yourself once in the Zoom room, please follow the steps below.
Section 5: you're done!
Congratulations! At this point, you should be completely set up for your upcoming event. If you have an questions or concerns about the event, or if something was unclear, don't be afraid to reach out to your event manager or shoot us an email at [email protected]

