
Sections covered in this guide
- Setup up your 2 camera feeds
- Setup up audio playback laptop
- Join zoom room on each of your devices
- Rename each device in zoom
minimum Equipment required
- 2 cell phones
- 2 camera tripods set to 60 inches (5 feet)
- 2 phone tripod mounts
- 1 laptop with headphone output (so you can run your audio playback to your gym's speakers)
- 1 additional device to watch the show and cue your team
IMPORTANT:
EVERY TEAM
MUST BE ON-STREAM 20 MINUTES BEFORE
THEIR TIME
EVERY TEAM
MUST BE ON-STREAM 20 MINUTES BEFORE
THEIR TIME
Section 1: setting up your camera feeds
In this section we will talk about the basis of our entire setup for this guide, the cameras. This includes placement of and setup of the cameras in your studio (gym), as well as configuring the shot once placed.
The setup will consist of
*if your team needs any of the equipment listed above (sans phones), CLEAR STAR MEDIA has you covered. Check out our virtual competition package here.
Before we get your camera placed, we want to get your camera setup as a camera feed for the event. All you need to do to do this is:
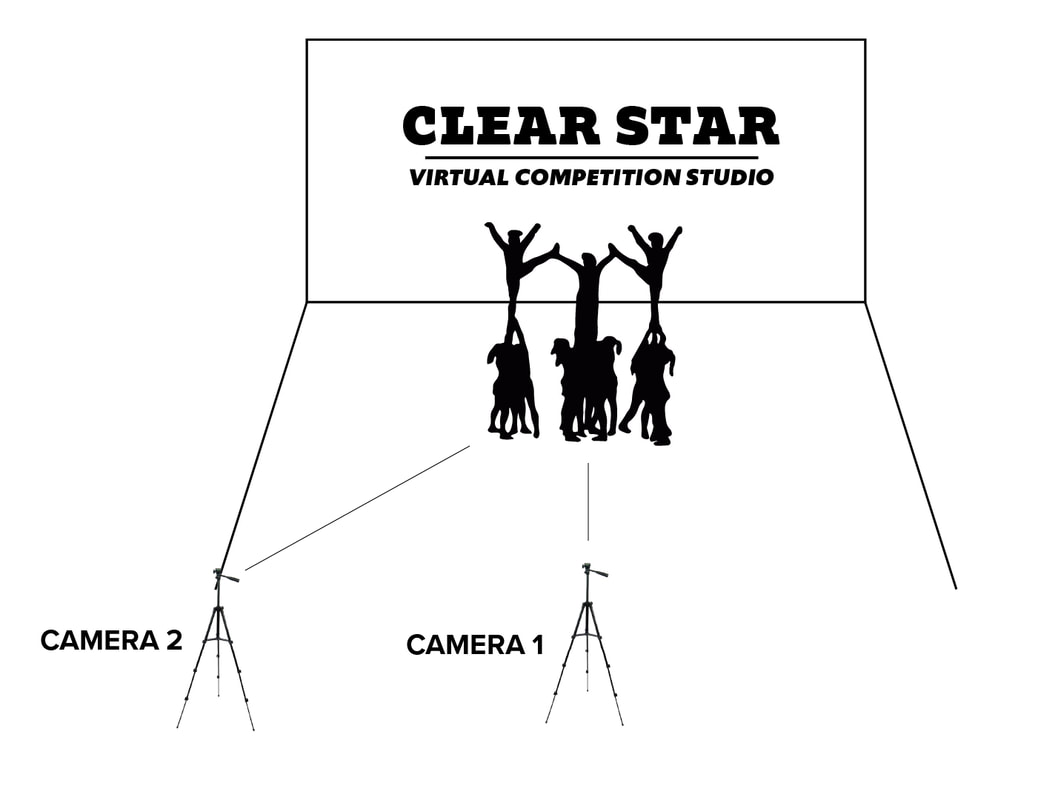
Next up is placing your cameras in the correct spot in your studio (gym). Please see diagram below for placement.
The setup will consist of
- 2 modern smart phones
- 2 tripods that are set to 60 inches (5 feet) tall
- 2 tripod phone mounts.
*if your team needs any of the equipment listed above (sans phones), CLEAR STAR MEDIA has you covered. Check out our virtual competition package here.
Before we get your camera placed, we want to get your camera setup as a camera feed for the event. All you need to do to do this is:
- Download the Zoom app on your device ( linked here )
- Join Zoom room via the link sent to you by your event coordinator in your welcome package. This link is the only zoom room you are going to need for the entire event.
Next up is placing your cameras in the correct spot in your studio (gym). Please see diagram below for placement.
|
couple notes on camera placement:
CAMERA 1
CAMERA 2
|
|
|
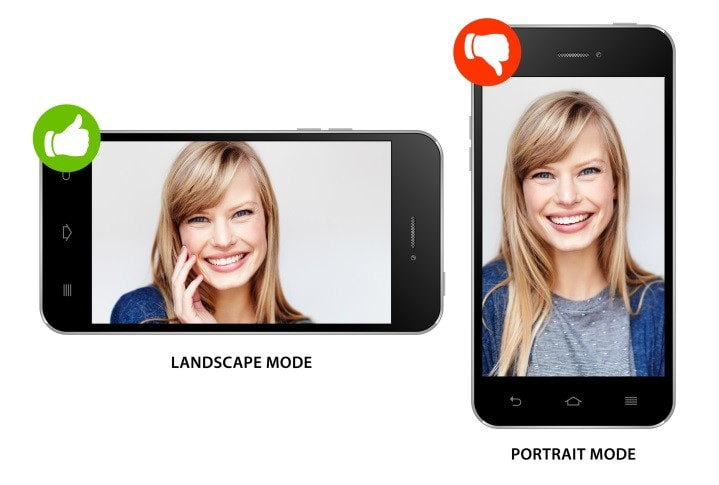
IMPORTANT:
When using your phone as a camera make sure you are
|
|
Note on lighting: please make sure that all of your overhead gym lighting is on and, when possible, all door or windows are either closed or behind the camera. If you have an open window with daylight on camera, the lighting will backlight the contestants.
Section 2: setting up audio playback
This section will cover the setup of your audio playback device. For this, you can use any computer (laptop of desktop), and then connect that computer to your studio's (gym's) sound system to ensure proper audio playback.
To get your device ready for playback you will need to take these prerequisite steps:
Once the competition begins, someone from our team will make your playback computer a co-host. This will allow you to share your screen / audio.
To allow audio playback of your computer through zoom, please follow the tutorial below:
To get your device ready for playback you will need to take these prerequisite steps:
- Using the headphone jack, connect your computer to your gyms sound system via an audio cable.
- Set the audio level on your playback device to 85.
- Set the audio level of your music player on your computer to 85 (or near max).
- Download the Zoom app on your device ( linked here )
- Join Zoom room via the link sent to you by your event coordinator in your welcome package. This link is the only zoom room you are going to need for the entire event.
Once the competition begins, someone from our team will make your playback computer a co-host. This will allow you to share your screen / audio.
To allow audio playback of your computer through zoom, please follow the tutorial below:
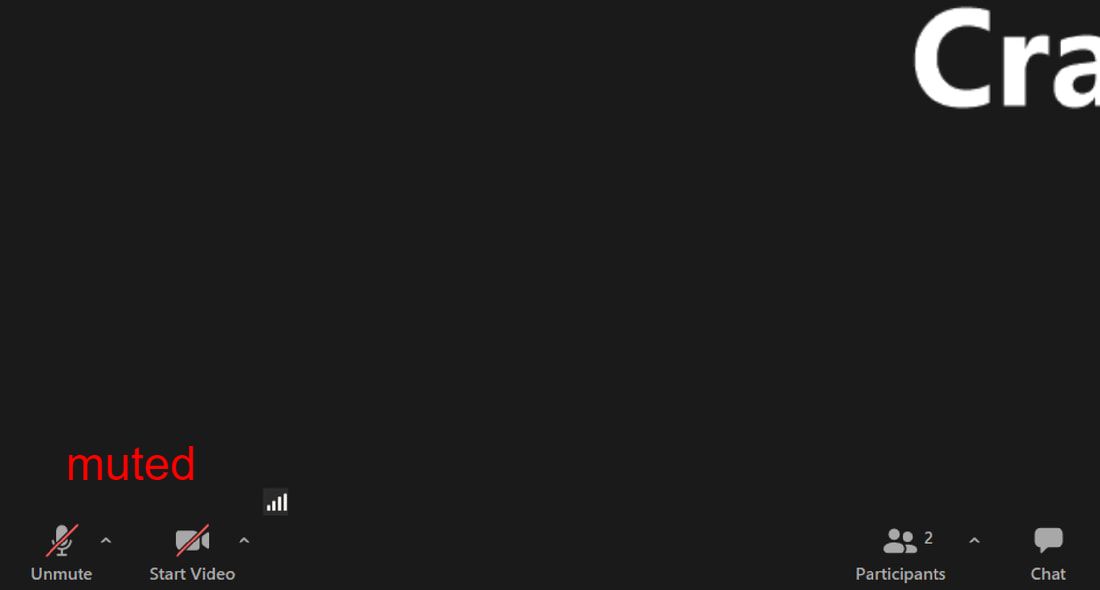
STEP 1: Make sure your mic is muted by checking the bottom left of the tool bar in the Zoom application.
|
|
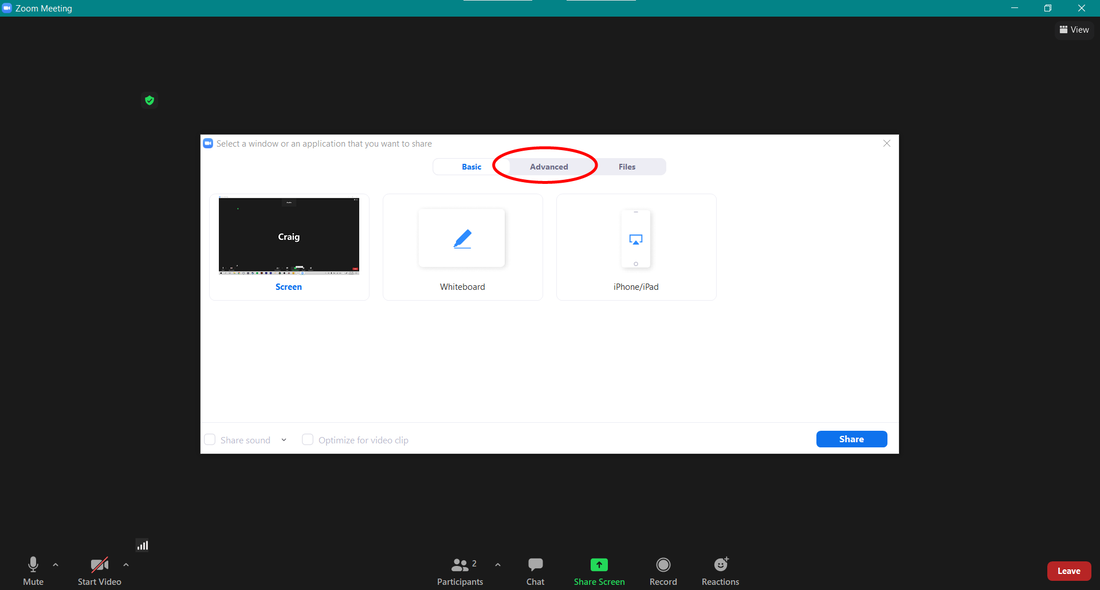
STEP 2: Click the Share screen button in the center of the bottom tool bar of the Zoom application

STEP 3: At the top of the window that opens, click the button that says "ADVANCED"
STEP 4: Click music or computer sound only in the the "ADVANCED" options section
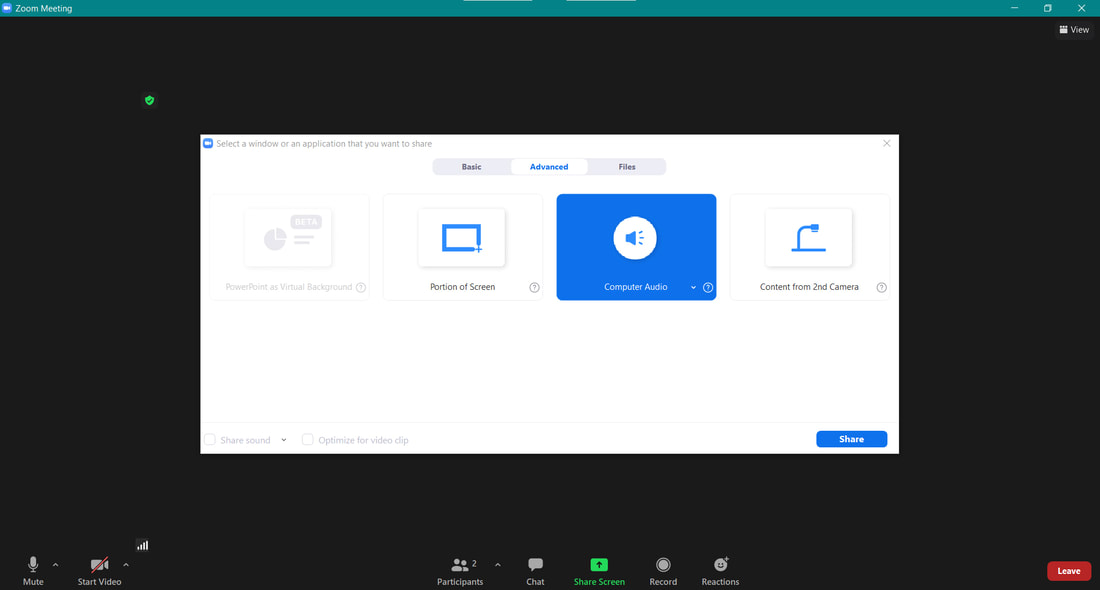
STEP 5: In the lower right hand corner, click the SHARE button.

Note: Make sure that the audio playback isn't playing when you initially share your audio. Only start playback when cued to start. You are welcome to test these setting in your own personal zoom before joining the show zoom.
Section 3: Renaming yourself in zoom
This section will cover how to rename each of your inputs once your in the Zoom room, as well as what to rename yourself to.
It is CRUCIAL that you follow correct naming conventions during the event, as it is the only way our team knows who you are and what input each device is.
The naming conventions are as follows:
Camera 1: [STUDIO NAME] - [TEAM NAME] - 1
Camera 2: [STUDIO NAME] - [TEAM NAME] - 2
Music Playback: [STUDIO NAME] - [TEAM NAME] - AUDIO
An example for Camera 1 would be something like this: Clear Star Media - The Star Boys - 1
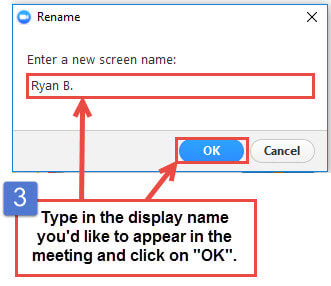
To properly rename yourself once in the Zoom room, please follow the steps below.
It is CRUCIAL that you follow correct naming conventions during the event, as it is the only way our team knows who you are and what input each device is.
The naming conventions are as follows:
Camera 1: [STUDIO NAME] - [TEAM NAME] - 1
Camera 2: [STUDIO NAME] - [TEAM NAME] - 2
Music Playback: [STUDIO NAME] - [TEAM NAME] - AUDIO
An example for Camera 1 would be something like this: Clear Star Media - The Star Boys - 1
To properly rename yourself once in the Zoom room, please follow the steps below.

|

|
|
Section 4: you're done!
Congratulations! At this point, you should be completely set up for your upcoming event. If you have an questions or concerns about the event, or if something was unclear, don't be afraid to reach out to your event manager or shoot us an email at [email protected]